Description of SSH connection which is a feature of Tera Term. When the TTSSH module is installed, Tera Term supports the SSH connection.
SSH is composed of two protocols, namely SSH1 and SSH2. Be careful that SSH2 is NOT upward compatible of SSH1. These protocols should be chosen carefully according to the host to be connected. TTSSH supports both protocols.
There are several ways of authentication methods of SSH as follows
In this document, we will describe Password authentication and Key-pair authentication which would be most widely used.
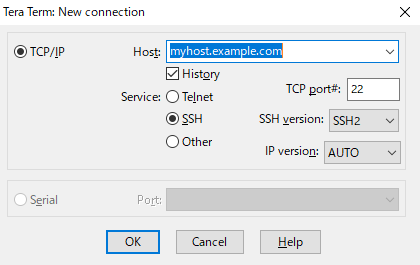
When Tera Term is activated, the following dialog will let you choose a way of connecting.

When using SSH, you should match SSH version to the host to be connected.
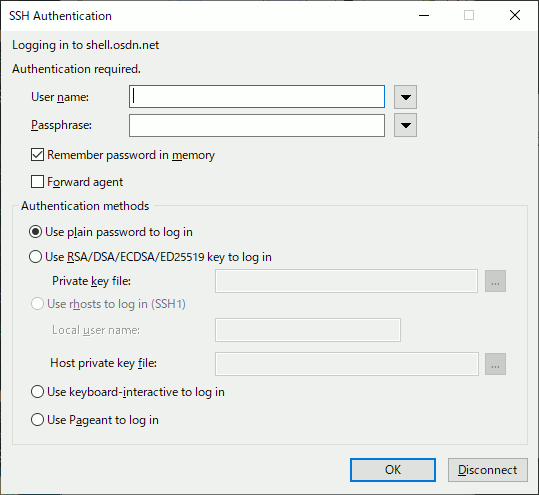
Once connected, then you will be prompted to select authentication method in a dialog.
You can change default value of this dialog in "TTSSH: Authentication Setup" dialog

The TTSSH can support some authentication methods and a user should select one of methods. When an authentication method is failed, the TTSSH does not retry to authenticate another method.
For example, the OpenSSH client will be able to login to the server without regard to the difference the password and the keyboard-interactive authentication. However, the TTSSH can not login to the server which only enabled keyboard-interactive and public key authentication by using the password authentication.
When this dialog is displayed, username was entered according the setting.
In addition, when the username is entered, or when the focus is moved from the input field after inputing username, the server is accessed according to the setting.
You can select an option by pushing the button next to the username box. If username is empty, tab key moves focus to this button. If username was enterd, tab key moves focus to password and passphrase input box.
The password and passphrase input box differs from normal dialog box.
You can select an option by pushing the button next to the username field.
On SSH connection, Tera Term searches the server host key into the ssh_known_hosts file. If the host key can not be found, the security warning is shown.
The result is described below.
When the security warning message is shown, a user will receive a network attack known as spoofing secretly redirecting the user's connection to a different server.
However, this message will be shown when a user connects to a server for the first time and the server's host key is newly updated by reinstalling the server computer. If a user will see this warning, please compare a fingerprint on the warning dialog to the trusted fingerprint.
OpenSSH: The server administrator can get the fingerprint(hash) of the server's host key by using below command.
ssh-keygen -l -f /etc/ssh/ssh_host_rsa_key.pub
When a user is using SSH to connect to a server, the user can use SSHFP RR (Secure SHell FingerPrint Resource Record) defined in RFC 4255. However, this feature is experimentally implemented because the current Tera Term can not do the DNSSEC verification.
A domain owner can register the SSHFP record into the DNS zone. The client software(Tera Term) can get the SSHFP record on connection and verify the record with the server's host key.
However, this feature can be used on Windows 2000 or later by the limitation of the Windows resolver.
Please refer to below one sentence in RFC 4255.
A public key verified using this method MUST NOT be trusted if the SSHFP resource record (RR) used for verification was not authenticated by a trusted SIG RR.
The DNSSEC verification always fails because the Windows resolver used by Tera Term can not verify the DNSSEC signature.
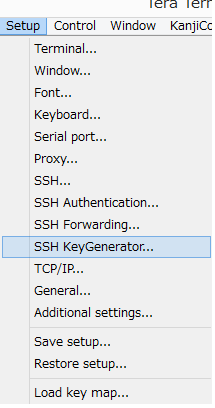
Here, we will describe how to generate Public/Private key pair. To generate key, select [Setup] menu and choose [SSH KeyGenerator...].

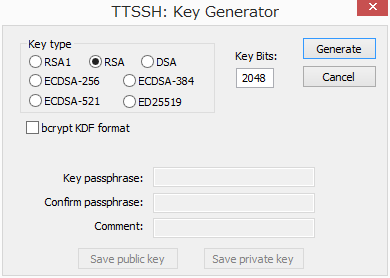
Then you will see a dialog of key generation.

[Key type] is to select key types - [RSA1] for SSH1 protocol and [RSA], [DSA], [ECDSA] or [ED25519] for SSH2 protocol should be chosen respectively. After choosing key type, you will be prompted for pass phrase by clicking [Generate] button. Type in pass phrase (like a password, but it can include blank and usually much longer than password). Then click [Save public key] button, [Save private key] button to save these keys. File name can be left as default if you don't need. At the completion, click [Cancel] to finish this process.
For this file, when it is saved as default, all files which have an extension of [pub] (public key) will be stored in the specified location in the server (usually, it is (home directory)/.ssh/authorized_keys). All files which have NOT an extension are recognized as private key and you have to specify it at login.
Note: Since Private key should not be disclosed to other party, please be careful to make it secret. Please make that it is NOT sent to server by accident.